How to Remove Red Eye on iPhone, iPod, and iPad Photos
This wikiHow teaches you how to use your iPhone's Photos app to remove the "red eye" effect caused by flash photography.
Method 1 how to remove red eye on iphone ios 10
Using Red Eye Correction in Photos
Image titled Remove Red Eye on iPhone, iPod, and iPad Photos Step 1
1
Open the Photos app. It's a white app that contains a multi-colored flower image.
Image titled Remove Red Eye on iPhone, iPod, and iPad Photos Step 2
2
Tap Albums. It's an icon of layered rectangles in the lower-right corner of the screen.
Image titled Remove Red Eye on iPhone, iPod, and iPad Photos Step 3
3
Tap All Photos. It's most likely in the upper-left portion of the screen.
If you don't have iCloud Photo Library turned on, this album will be called "Camera Roll."
Image titled Remove Red Eye on iPhone, iPod, and iPad Photos Step 4
4
Tap the image you'd like to edit. You may have to scroll up to find it.
Image titled Remove Red Eye on iPhone, iPod, and iPad Photos Step 5
5
Tap the "Edit" icon. It's an image of three "sliders" with buttons in the lower-right (iPhone) or upper-right (iPad) part of the screen.
Image titled Remove Red Eye on iPhone, iPod, and iPad Photos Step 6
6
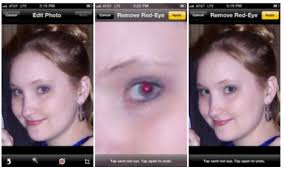
Tap the "Red Eye Correction" icon. It's the image of a white eye with a diagonal line crossing out the iris.
On iPhone, it's in the upper-left corner; on iPad, it's on the right side of the screen.[1]
The Red Eye Correction icon only appears in photos taken with flash or in screenshots. Red eye does not occur if no flash is used, so it is not an option for pictures taken without it.[2]
Image titled Remove Red Eye on iPhone, iPod, and iPad Photos Step 7
7
Tap each red eye. Red Eye Correction will automatically alter pixels in the area you tap.
If you don't like an edit, just tap the eye again to remove it.
Image titled Remove Red Eye on iPhone, iPod, and iPad Photos Step 8
8
Tap the "Red Eye Correction" icon. Doing so exits red-eye mode and returns you to the main Edit screen.
Image titled Remove Red Eye on iPhone, iPod, and iPad Photos Step 9
9
Tap Done. It's in the lower-right (iPhone) or upper-right (iPad) corner of the screen. This saves your edits.
If you decide later that you are no longer happy with the changes you made, return to the Edit screen and tap Revert in the lower-left corner to restore the original image.
Method
2
Avoiding Red Eye
Image titled Remove Red Eye on iPhone, iPod, and iPad Photos Step 10
1
Turn off flash. Red eye happens when a camera’s flash reflects back off the retina at the back of an eye.[3] As such, you can avoid red eye altogether by taking pictures in well-lit areas where flash is unnecessary.
In the Camera app, tap the ⚡icon in the upper-left corner of the screen to change the flash options.
Tap Auto if you'd like the Camera app to activate the flash only when lighting conditions require it.
Tap Off if you don't want the flash to activate when you take photos or videos.
Image titled Remove Red Eye on iPhone, iPod, and iPad Photos Step 11
2
Redirect the subject’s gaze. Ask your subject to look slightly to one side of the camera, rather than directly toward it.
Image titled Remove Red Eye on iPhone, iPod, and iPad Photos Step 12
3
Avoid flash photos of subjects who have been drinking. When people have been drinking, their pupils don’t react as quickly to light. This means there's more time for the flash to bounce off their retinas, which increases the likelihood of red eye.[4]